Dragon breath- Fafneer, Volatile Fire Breakdown

NEWS: This week in Dragoborne, we get some exciting things to look at. Regional side event promo, Euro having an official circuit, countdown timer for the release of the game and Trial deck tourney info. Party on (This weeks sponsored song is Future – PIE ft. Chris Brown).

party.gif

I ordered 6 boxes of Dragoborne. Two of them I need to thank my loyal Crystal Cavern Sponsors, Mark Shoulders and Alex Velsaquez. Your donations will infinitely  be thanked and be used for the benefit of helping others. Hopefully next set I can get even more. So, what I do have planned for everyone is a box opening video. One of the hot topics that is in the air at the moment is, what is the pull rate of the rare cards and so on. With this video, although 6 boxes is not enough, it will show some understanding of what you can pull, which will help people who want to buy boxes in the future. This will further help others as we can get some answers solved possibly such as any alternative art rare cards and so on. One thing I see lots is the question: Do RR cards come foil or no? Reading on, the official Bushiroad description they state, and I will quote them: ” Parallel holo versions of all cards will also be randomly inserted!!” which is a direct copy and paste from the following link http://dragoborne.com/product under the description for Rally to War. Using context clues, this might very well mean there is going to be a normal, and a foil version of the RR cards… they don’t come foil. Or if they do, there is going to be an alternative version of the R and RR cards. I am just using context clues from a direct quote as my evidence. Whether I am correct or not, we will see later on.

Now recently as we come to a wrap up of the spoilers for the set, we get a more clear understanding of the cards for the whole set. Regional will come soon, as soon as the end of August to be exact and will go through all of fall. I will step up my game to provide quality content here in the Caverns to help assist those who want to take this game seriously, but bare with me as this is a solo project so I might be slow on some posts. I was looking at social media and Discord comments about a particular RR card. Fafneer, Volatile Fire to be exact, and today in The Crystal Caverns, we will take a look at this RR card.

dragoborne fafneer, Volatile Fire

Initial Thoughts

Lets see. Insta-destroy a shield and pick a card to do 5 damage to for just 6 cost. If this was a spell it would be edgy to use. However, this is a creature, meaning you can attack with it too. Late game structure, your opponent is down to 1 fort with 2 barriers, 2 creatures and 1 ambush and a shield. This card lets you take out the shield and potentially 1 creature. This leaves you with 1 more creature, 1 ambush and 2 barriers, all which theoretically take 3 attacks to stop give or take +2 attacks depending on what ambush (Aka cards that can stop multiple creatures in 1 fort like Dragon`s Presence). So this card alone gives you 2-3 “attacks” during the turn. Attack 1 is instantaneous destruction of a shield, 2 is 5 damage to a creature and 3 will be actually attacking with this card which is up to 8 damage to a creature. You can’t say this is a bad deal, for only 6 cost you get a bang and a boom for the buck. Most creatures are 5 EDR and under, and a good number stay 5 and under even with a cross giving them a +1/+1. So, would you use this, most definitely in a nice tempo based decks. Midrange can also use this as a 6 drop when they get 6 resources. Early game this will destroy most cards with the burn 5 effect, and a shield destruction, guaranteeing a free barrier damage. Combo this with a torch when your red die is on a 6 and you will only need to worry about ambushes when destroying a fort. Although they do exist, the plain majority of the cards in this 1st set have an average of 5 EDR. This effect is a clear cut with they cards your opponent might be using.

Pros vs. Cons

Pros:

Very good use of 6 resources

Gives you a free shield destruction and 5 damage to a creature

Can go over huge walls with the cross effect

Best if used with another burn card to ensure a clear fort to attack

Cons:

Uses 6 resources so you must be sure you want to spend a turn playing this card

Still susceptible to ambushes

My Rating: 9/10

Hmmmmmmmmm, cupcakes or muffins. I am not sure what I want to bake. And be sure to check out my other posts/articles, they can be kinda interesting or boring. Now, lets wait just a few more days for our trial decks. Good luck to everyone playing the game and hope it grows. I will think of doing something special at the Dragoborne side event at the Houston regional late September, so if you plan to go there be sure to keep your eyes and ears and nose open for more details. Like, comment, or leave a reply. I love to listen to feedback or answer any questions/arguments. If you have a civil debate you want to discuss I am open to talk about whatever the argument is about. -Cake

Trial deck analysis for Shadow Legion, Mystical Hunters, and Alpha Dominance

NEWS: This week of Dragoborne has brought onto us a plethora of cards. We have almost every card spoiled, all trial decks spoiled, and now it is time to theorycraft a few decks. In the upcoming weeks before and after the set is released, I will be talking about many new decks and ideas that one could create. This could provide insight to new people, set a template for people who want to craft a deck, or bring up reasonable questioning in differences with the ideas of other deck builders in the community. I am super excited to start formulating an actual deck. So far leaning on a rush deck as I am a very aggressive player and love aggro decks in every card game I play, but we got some nice variety with what we see. Before we get started on that, let us look at the different trial decks and break them down. Be sure to check out my other articles. They also prove to be handy and nice. I will keep this blog updated more.

The trial decks do have cards that can prove to be potential for an actual deck, so check them out and buy one. They come with the respective dice which is handy, and I believe there is going to be a tourney for the trial decks. Whether we can mod the trial decks or not, and whether we can use a custom sideboard or not, I am not sure. If I find out I will inform anyone who asks. Now let us look at our first trial deck

Shadow Legion

dragoborne Lady Valistra.jpg

Initial Thoughts

“Shadow Legion is a straightforward deck that takes the fastest route to finish the game. Play fast creatures and overwhelm your opponents with a barrage of attacks!”

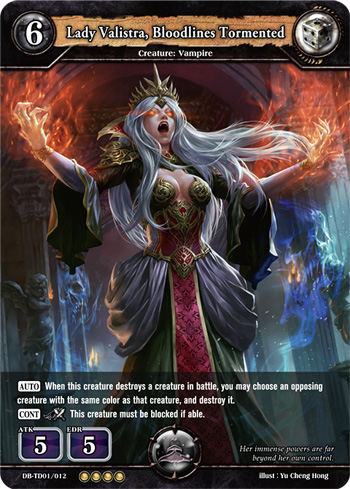
With that quote being said, this deck will be aggro based. The fastest way to victory aka spamming low cost cards and beating your opponent before they can summon a heavy card. So, we have Yellow to keep your hand in check with draw, Red with very good ambushes and burst damage to help clear things, and black plain out destroys whatever gets in the way. Lets look deeply at each color. Starting with Yellow, Bountiful Angel makes a comeback from the demo deck, this time with an ability. You have 2 cards that provide draw power, something you need in a deck where you are able to play your entire hand out in 3 turns since having an empty hand might not be very good for anyone as of now. Then you have 2 decent vanillas, Sunscale Sage being an upgrade from the 3 cost demo deck version of Bountiful Angel, which is merely a 3 cost 3/3. Red, provides 2 nice ambushes that deal damage. The prominent demo deck ambush, Pyroblast, knocks itself a spot in the demo deck, and a nice new burn ambush creature, Ravian, Battlefield Shrieker. Pyroblast does have more potential as it can deal damage equal to the Red die, but Ravian is a consistent 2 which helps solve problems when your Red die hits 1. Then we have 2 cards that deal damage to Dragoshields and are cheap 1 cost cards, and a simple Red vanilla. Black is where it gets interesting. We have a summon fort burst, a cheap deadly, a nice hand fixer, and an interesting spell. Death trap could prove to be a card that can fail you, as it destroys an attacking creature. That might just be a simple small creature instead of a big one. Adraste’s Disdain can help you a ton when you are stuck dealing with hard to overcome, Dragocross cards. It also gives you a second effect with a Black 4-6 roll in which you destroy a shield too. For a 4 cost card, this proves to be very beneficial as most of your cards cost 1 or 2, so late game when they play a huge wall, you can get over it easily and push for game. Honorable mention to my Brother-in-Law, Cavalier Nosferatu. He does not just have nice artwork, but a great hand fixation effect. Grab a card in your discard pile that you need and discard a card you do not need. This helps you when you have a dead card in hand or something very important in your discard pile. Now, lets get to the core. Lady Valistra, Bloodlines Tormented. [AUTO] When this creature destroys a creature in battle, you may choose an opposing creature with the same color as that creature, and destroy it. Her second effect is [CONT] [Dragocross: Black] This creature must be blocked if able. So, she does well against mono color decks as she can destroy 2 of the same color creature with 1 attack. And she forces a block if able, so your opponent cant chose to lose a barrier over blocking her. Of course, crossing her is a must if your Black fort is down or such. You want her to be big enough to where she attacks without fear of being destroyed before battle, and enough power to destroy a creature. The ability is on battle, not on attack, thus meaning her effect lasts during your turn too. Personally, I think she is iffy. Yes, very good to play her as a 6 cost since her effect can lead to a double kill with 1 attack. Her only problem is cards that target destroy can just pick her and thus, your strongest source of power is gone. In this deck where everything is low cost, playing her is worth it late game since you probably can play her and 2 more creatures.

Pros vs. Cons

Pros:

Very aggressive, wants to end the game as soon as possible

Good board clear

Strong destruction, able to destroy big walls that you can’t normally with an attack

Cheap cards, you can play many creatures in 1 turn

Cons:

Loses to itself in a mirror match

Once late game hits, if you are unable to get over big cards, you can lose easily

Can run out of steam fast if you don’t draw into Yellow

Mystical Hunters

Dragoborne Remus

Initial Thoughts

“Mystical Hunters is a strategic deck that rewards players for planning their turns and plays. Lull your opponents into a false sense of security, then counter-attack swiftly!”

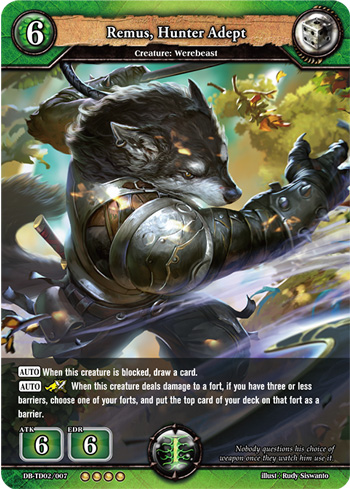
A slower deck that relies on building up in order to push for victory. This deck relies on ending your opponent with the rather big cards in the deck, yet keeping tempo with small cards… a mid-range deck if one must say. Yellow is your defense, Green is your offence, and Blue will be your control. Let us break down the colors for this deck. Starting with Yellow, 2 notable cards would be the 1/5 golem that gets summoned. It might be weak in power, but its EDR is high enough to withstand many small creatures and survive until the end of battle. Next, we have a nice Yellow card, Axion, Herald of Armies. With him, you can place him at a fort with 2 cards, making a triple. This gives you options as now you A- can have more than 6 creatures total, B- You have more options to attack/defend, or C- You now can block with 3 creatures before they go in to take out a barrier, making it very good as a card to defend your last fort. The second power allows you to move and stand the card at a different fort upon having a shield destroyed if he is crossed with a yellow die. This card alone can do quite the stuff if you use him with Angelica, The Light of Logres, but that is a story for another day. Green gives us nice cards for attacking. You have 2 vanilla cards, 1 summon ambush that gives you the option to rest a creature too, a nice 0/5 card that can defend multiple times, and the big card of the TD. Honorable mention to Guardian of the Forest. He can block and if your fort takes damage, restand him. Now if you give him the Yellow die, you get a draw every time he blocks. That means you basically can get 2 draws since he will be a 1/6, and that is something not many cards can destroy in 1 hit. Remus, Hunter Adept is a win/win card as you get an effect if you hit or miss a fort. When blocked you get a draw. If you hit, with a Yellow cross you can gain +1 life via barrier if you have 3 or less barriers, almost like a heal trigger from Vanguard. That places some pressure as you will either plus or heal, so your opponent needs to chose which will put him at a lower disadvantage. It is unlikely he will have an ambush that can destroy a 7/7 but that is a clear counter to this heavy costing card. Rest counters also work as you rest the card before it hits anything. Finally, Blue gives us 1…2…3 separate rest abilities to manipulate your opponents attacks. Check my analysis with the keeper in my previous article to see more on what it can potentially do: https://crystalcavernblog.wordpress.com/2017/06/17/a-table-for-2-and-some-promos-for-you-baltheos-devourer-of-hope-and-the-keeper-analysis/                           Hidden Arts, Reverse Thunderstrike is a decent card that stands all of your cards and gives you a draw. Personally, I prefer E.M.P because I would rather rest the characters your opponent has than restand and block using my creatures instead of saving them for next turn. By your first block, your creatures should be almost dead, or dead. With this restand, you basically will have your cards destroyed with the second block. The good thing about this is if you have cards such as Guardian of the Forest, then you are set to plus. Hidden Arts, Water`s Edge Shuriken would be your finisher card, giving all of your creatures assassin as you use that effect to finish off the final fort.

Pros vs. Cons

Pros:

Good defensive cards

Lots of rest abilities to prevent damage triggering effects

Abilities to stabilize hand size

Uses cards that don’t die easily

Good finisher if you set up correctly

Cons:

Loses to target destroy effects from black cards

Can be rushed if you don’t set up properly

Needs to maintain efficient use of resource to play properly

No true source of clear, relies on rest rather than destroy effects

Alpha Dominance

Dragoborne Izarco.jpg

Initial Thoughts

“Dictate the flow of the game with the Alpha Dominance deck and crush your opponents! Dominate the field, and victory will quickly be within your grasp!”

This is my personal favorite, and what I believe I can call, a late game monster. With this deck, you will do poor early game, but it has the best late game out of the 3 TD. That being said, you need to be extremely careful early game because you will lose to the other 2 TD if you play greedy early. Let us take a crack at this one now. We have Green for tempo, Blue for slight manipulation, and Red will be out power core of this TD. Starting with Green, we have a big on summon fort burst, a card that gets strong based on the different color cards you have on the field, and 2 cards I want to talk about specifically. First, Fleetwing Sprite. This card is a MUST HAVE in your starting hand due to the early resource plus it gives you. Yes you lose a card in hand, but overall, you are 1 resource ahead now. This is key to such decks like this as your core revolves around high cost cards. I love how this card screams ramp, a very nice mechanic seen in games such as MTG. With ramp mechanic, the idea is to play cards that give you resource. This way, you can summon huge creatures very early which places lots of pressure on your opponent. She also has a fort burst, meaning she will never be a dead card in your deck at any given point. Next we have Nature’s Touch. This card gets the honorable mention of this set as it will be a very useful card when the actual set comes out. You can use it to re-summon many creatures that are helpful, so expect to see this card in Green decks in the future. Laelania`s Call can be good to have in your starting hand if you have a big green card like Primeape Javelineer. A good combo you can do with this TD is turn 1, use that card to summon Primeape Javelineer,  then use the last color resource to summon Highlands Rogue. The fort burst is good but very iffy. It does best if you do manage to have Izarco in hand, which we will get to later. Now we have 4 Blue cards. If you want to hear about All Guns Blazing check my article here: https://crystalcavernblog.wordpress.com/2017/07/05/lethal-push-a-first-look-at-all-guns-blazing-and-gluttony-of-albert/                                                                                                 Rejuvenate keeps you in check by giving you draw and resource if your green die is 1-3.   Dramph Tommar, Kingpin manipulates your dice, so you can make sure you have the correct number on your green die for Rejuvenate. You can also use him to exchange numbers to increase the value on your remaining shield. Say you only have Blue fort left, that means you can only use the Blue die as your shield. You roll a 1 on the Blue and a 5 on the Green. Swap the 2 values so that way, you have a 0/5 defender and your Green die can trigger rejuvenate. A very swell combo you can use on your opponent. If you roll all low numbers on your dice, you can cross the catfish with the Blue die to increase the values by 1. Finally we have Red. Carefree Orc has its own separate article on my blog so be sure to check that out. Most other cards are demo deck cards so players should have some sort of knowledge about their potential. The main focus will be on 2 new cards, Stormfeather Screecher and Izarco-Tvash, Born of Magma. Stormfeather Screecher would do better in a R/U deck as you just need to disable the defenders and clear any ambush/dragoshield. Then you can smash for 2 damage. The second effect is not necessary, not many cards can get over a 7/7 and your goal when attacking with this card is to deal damage to the fort, not a creature. Now for probably the most talked about card in Dragoborne so far: Izarco-Tvash, Born of Magma. [AUTO] When this creature is summoned, choose one of your dice, and change its value to 6. Then, choose any number of opposing creatures, and deal 6 damage divided as you choose among those creatures.
[AUTO] [Dragocross: Red] When this creature is destroyed, choose any number of opposing creatures, and deal 7 damage divided as you choose among those creatures. So, you get a nice 0/6 dragoshield or a die you can use for a specific effect when it is 6. You deal damage to clear all the weak creatures or just to take down a certain big creature. And you get an effect when you cross it that lets you deal 7 damage. The key that makes this good is divided damage. That means you can ping all the 1-2 cost creatures your opponent has, or just use it on a big card. So you do that 2 times, when summoned and on death. This forces your opponent to make sure the card does not die. The only downside to this is the cost. 7 cost means you gotta spend the resource for a whole turn on this 1 card. With the ramp card in this deck, you can summon this as early as possible, but it is still best to summon it with extra resource so you can play a spell or another small card. This is what I was meaning early, you need to ramp as fast as you can or suffer.

Pros vs. Cons

Pros:

Super strong late game

High burst potential

Very nice ramp to give you resource you need to play big cards

Very good finisher with All Guns Blazing

Dice manipulation

Cons:

Loses to rush decks easily

Not much draw potential as the other TD

Ambush doesn’t stop attacks as well as the other TD

High costing cards can brick your early hand easily

Probably the hardest to use TD due to the thinking needed but the most rewarding

Conclusion

A long one huh? It took me a few days watching this but I managed to finish it in time for EVO finals. Hopefully this article gives you a good look at the 3 decks so you can pick which one best suits your play style. Remember, they are all good, none of the TD would be classified as garbage. This game does seem to have a high skill curve in compared to other games, so a good player can do good with many decks compared to a poor player. If you want to talk or argue a point, feel free to contact me or leave a comment. I will be glad to answer you shortly and refute or explain a point. Also be sure to keep in check with this blog. Now that we have a more clear understanding of the cards in this starting set, we can break them down and formulate decks. My first deck article will be a surprise, but here is a little hint: Weenie. Also be sure to check other content creators. I am not the only one and it is best to hear the viewpoints from other people so that way you get a nice analysis on what is good and bad. They spend time writing or creating videos, so be sure to thank the hard work they put into creating the content. Until next time, adventure on.


The Mortal Kombo Series: Chapter 1

With plenty of cards set out at this time, my long waited series can commence: The mortal Kombo series. During this, I will talk about potential combos using cards that are revealed and out so that way others can learn from these combos… or even formulate better combos. It is all about growth and that is my goal, to promote the growth of this game. So today I will be talking about 3 relatively simple combos that can be done which can potentially benefit your deck.

Kombo 1: Grave Champion/Goblin Madcap

Some people consider Goblin Madcap to be one of the most annoying demo deck cards, others consider him to be underwhelming. Regardless of opinion, this combo works real well to give you a nice push. This combo works best early game when your opponent barely has any cards on field. If you go turn 1, play Goblin. Next your opponent will play his card. Now you have a 50/50 chance of this to be a success as Goblin deals 3 damage to a shield. As long as your opponents dice is 1-3, play Grave champion the next turn, and sacrifice the Goblin madcap. Your opponent will be forced to sacrifice his only card unless he played more than 1 card during the previous turn. This gives your opponent a minus, and if his shield is 1-3 you use Goblins effect to break it, thus leaving you with an open field to attack. This doesn’t have to be done super early although the earlier, the better, as your opponent chooses what he must destroy. That means in later turns, he will have a full field of strong and weak cards and will be more obligated to just sacrifice his weakest card rather than his only card early game.

The Kombo: Goblin Madcap>Grave Champion>Destroy shield by sacrificing Madcap>Opponent chooses a card to sacrifice>Push for damage

The Katch: Shield must be 1-3 for you to pave a clear path with madcap, and this effect is better early game as the earlier you play Grave, the less options your opponent has to chose from for sacrificing.

Kombo 2: Eleanor, Queen of Storm/ Telios, Erstwhile Guardian

Ever wanted to attack a fort, risk free of any harm? Or have you ever played a game where your opponent was stuck on 1 barrier, and he had that unstoppable defense that costed you the game? This Blue/Green combo works well to give you the attack you might need late game to destroy that one heavily guarded barrier. You will need to cross Eleanor to disable any ambushes not just for her own attack, but for the whole turn. Attack with Eleanor first with the cross so ambushes have no effect. Eleanor’s attack might be enough to destroy a shield as she has 4/6, not factoring any power boosting cards or effects. Now, you attack with Telios. The good thing about Telios is that the effect goes off if you simply do damage, so even if the card doesn’t have enough power to destroy a defending card, you can still trigger the effect to rest a card. You would want to rest the other standing card for the fort you are attacking. This leaves you with a nice direct hit to be able to destroy the barrier and clean you the game.

The Kombo: Cross Eleanor>Attack with Eleanor>Attack with Telios>Rest any standing character using the siphon ability of Telios> Attack the barrier

The Katch: Fort burst, you could get unlucky and trigger one if you are attacking a fort with 2 barriers. If you are using this combo to attack the final barrier then you don’t need to worry as you end the game as soon as that barrier has been destroyed. This combo is intended for destroying the final barrier of the game, as that will be the most guarded barrier.

Kombo 3: Redfang, Born Leader/ Spellweaver Magus

White Green, a very good deck that focuses on growth and prosperity. The two cards here work well together as they both fit perfectly in a Yellow/Green deck. This combo isn’t much about dealing damage, rather than increasing your resource pool so that you can play bigger and stronger creatures in the upcoming turns. You would want to focus this combo to go off before turn 7 as you need 6 or less resources for Redfang to be of any effect. Summon Redfang with 3 resources and summon Spellweaver the next turn with 4. When Spellweaver is summoned you can pick an opposing shield and change the value to 1. This gives a direct chance for Redfang to go in and destroy the shield, thus giving you an extra resource. Spellweaver can cross with a green die to change another shield to 1, but that is not recommended early game as you need your shields. But that just makes Spellweaver a bit more useful in a Y/G deck as late game she can do much more than just her on summon effect just in case your green fort is destroyed. and you have a green die just sitting there. This combo gives you an attack with redfang and a defender which should be Spellweaver. A more tempo based combo, something midrange or control decks tend to utilize.

The Kombo: Redfang summon>Spellweaver summon>Change shield to 1>Attack with Redfang>Gain +1 resource if you are 6 or less

The Katch: Ambush… that activate if a fort is going to get attacked. Pyroblast can take care of destroying Redfang if the red die is 2 or more which thus negates the activation of Redfang’s effect as the shield won’t get destroyed.

Hope you enjoyed this. update on the Drago demo event, it went very good. I played 7 people and went 5-2. I also got to secure myself a playset of each promo. I will try to talk about that event in the future. For sure, I will continue this series as we get more and more cards. Be sure to check out the other articles and tell your friends to come look at my posts if they are ever interested in this game. And don’t forget to check out other content creators to look at the other perspective of how certain cards play. Until the next time, adventure on.

Lethal Push- A first look at All Guns Blazing and Gluttony of Albert

Hello guys, sorry it has been some time since I typed something. Don’t worry, the Crystal Cavern is back and ready to produce some nice gemstone worthy articles. Today we will be talking about finishers, 2 finisher cards that we got. Each costs 6 yet one is for blue, and the other is for black. Lets begin with the coolest looking one:

Dragoborne all guns.jpg

Initial Thoughts

Man, the art they create for this game never fails to amuse me. Kudos to this artist, I want a wallpaper or something of this card. Anyhow, here we have a nice 6 cost finisher. With this card, you can rest every card in the fort, and that means direct attack the fort for damage. You are still venerable to ambushes, but they can’t use anything in that fort to defend as now all of the cards are rested. This forces them to play over, which means say they have 2 strong cards on a fort, and they are both rested. Now they are forced to play over one of those strong cards in order to have a small blocker. This is a great finisher as now you don’t have to worry about getting over some strong wall or any card with an effect when they get destroyed. Likewise you can go over deadly cards that destroy your card when you attack it regardless of toughness. That is good when going against decks that run Undying Executioner and the most anticipated: Izarco-Tvash, Born of Magma. Use this as a final turn finisher when you know you can end the game, or if you want to just destroy a fort with 2 barriers. Another good counter for going over Izarco-Tvash, Born of Magma is to play this card, so you don’t have to deal with the split damage it does when the card is destroyed. Now you blue players can relax a bit, I know that card was the most talked about card so far, and people have been asking for solutions. This is a very clear one. If you fail to draw this card out and it is a barrier, it has a nice fort burst effect which rests and gives you a draw. That is more hand and 1 less attack for your opponent to use against you. This gives this card high utility as a fort burst or an endgame card, so it will be of some use regardless where it is placed. My strategy is to have field set up; make sure not many of your cards die the turn before even if you must sacrifice a barrier or two. That way you drop this next turn and destroy them with all you have unless you have enough to play this and one small cheap costing card.

Pros vs. Cons

Pros:

Grand finisher

Good counter to deadly cards

Good way to play over Izarco-Tvash, Born of Magma or any card that has on death effects

Fort burst which gives you plus 1 hand and -1 opponent attack; good to keep you in check for recovery

Cons:

Heavy cost

Only rests the cards in the fort so they are still alive

If you fail to end then you are going to get punished heavily since this will drain most of your banners

Ambush can stop you except ones that summon if the forts are full of cards

My Rating: 9/10

NEXT… Let us look at the black finisher. Gosh, if you love blue/black cancer you gotta try using both of these. Might be hefty because they both cost 6, but it might be fun to use. I will for sure use a test deck using 4 of each of these finishers.dragoborne Gluttony.jpg

Initial Thoughts

Once more, never will get bored of the art. Good job on this one too. So now we have a card that does something similar, yet different from Guns Blazing. Instead of resting, you destroy every creature in select fort. This can be helpful because as we saw in Guns Blazing, it only rests the cards. That means next turn, they just stand them and get ready to attack you back. You get punished harder if you fail with Blazing than this card. The downside is you will trigger effects such as the feared Izarco-Tvash, Born of Magma since this destroys them and Izarco has an on destroy effect. Otherwise I would play this over Guns Blazing. Therefore, what one could do is since they did announce side boarding for this game, one could play a few copies of this card or Guns Blazing and side the other card. Say you run 2 copies of this card in your deck, side in 2 copies of Blazing so when you do go against a deck that uses Izarco-Tvash, Born of Magma or on destroy effect cards, you can swap this with Blazing during round 2 and proceed to wreck. More glory for Blue/Black cancer players. It can also work for tri-color users as long as 1 banner is blue and 1 is black. I will be testing a plethora of color decks including Blue/Black, Blue/Black/Yellow, and Blue/Black/Green. Those articles will be out once the set is out as I need to study more before I can give an analysis. This cards fort burst does not give you draw which makes it slightly weaker than Blazing, but it gives you a choice in destruction which can be helpful.

Pros vs. Cons

Pros:

Grand finisher

Destroys the cards in the fort, forcing your opponent to play new cards after the turn is over

Fort burst, destruction too

Gets over big blockers or walls

Cons:

Heavy cost

Ambushes counter you harder here and summon ambushes can work since this clears space for a summon

You will get punished if you fail to end them but it wont be as bad if they don’t have many cards to summon next turn

My Rating: 9/10

Comparing the two

All Guns Blazing:

Rest over destruction. This helps you get over on destroy effects or deadly cards that will hurt you next turn

Fort burst rests AND gives you a draw

Summon ambushes cant work properly since you rest all the cards in the fort. So if the fort has 2 cards on it, you can keep pushing since the fort can’t have 3 cards and therefore they are forced to summon over, which can force them to lose a strong wall in order to have a blocker

Gluttony of Albert:

Destroys rather than rest

Fort burst only gives destruction, no draw

Gets over walls or big cards than can’t be destroyed easily

You won’t get punished as hard as using blazing since they won’t be able to re-stand the cards when your turn is over

Summon ambushes can stop you because they summon on the fort you used the card on

Both:

Both are 6 cost

Both have a fort burst making them useful regardless where they are

One is black and one is blue, so you can mix them up in a Blue/Black deck

Each should be used as a final finisher or if you really want to get through and destroy a fort

You need a good field setup because of the cost preventing you from summoning much the turn you use this card. If you are playing aggro you want to use this as early as you can

Ambush can stop your progress
Hope you enjoyed the read and found something new or informative. I will be sure to keep everyone informed as we grow deeper into this game. As I finish this article, it is July the 5th. I want to thank you all who asked me questions so that I can bring it forth to the Bushiroad team once they arrive at my shop today. I will have your questions answered and my own too. Next article we will try to go over a card or the questions that I asked. Hope they visit your shop, I bet the event will be real fun, and it is your chance to WIN WIN WIN.